Please note, this is a STATIC archive of website www.htmlgoodies.com from 16 Nov 2022, cach3.com does not collect or store any user information, there is no "phishing" involved.
Wednesday, November 16, 2022

Introduction to HTML5 Forms

Forms are one of the most important features of Internet applications, providing an interface to share information between a client and a user in a simple, yet effective, manner. Using forms is a crucial part of any business application, whether used online or offline. Web forms have always been fundamental to web apps and websites. Without them, various transactions, discussions, and chats would hardly be possible.

What Are HTML5 Forms?

Forms existed before HTML5, but the process of handling input was a little cumbersome. HTML5 brought new features to forms and provided consistency for accepting input throughout applications. HTML5 forms also consume less time in the development process. Now web developers can not only build visually stunning forms but they can also collect validated and valuable data through customized HTML5 forms.

New Input Types Introduced in HTML5

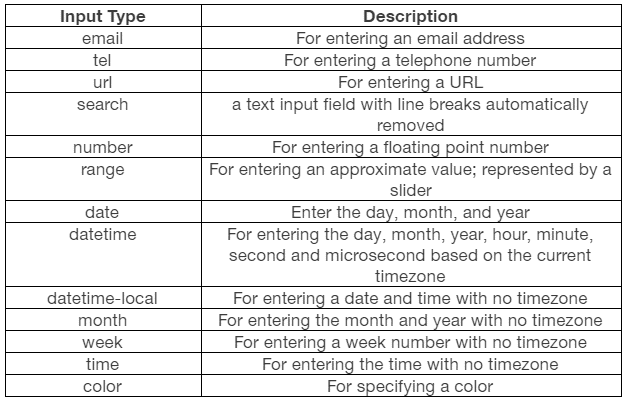
HTML5 brings some new input types that help users by providing native input and makes validating data easier without making use of any JavaScript code. The following table lists the new input types in HTML5:

HTML5 Input

Advantages of HTML5 Forms versus Simple HTML Forms

HTML5 forms built-in validation takes semantic markup to the next level. It provides the convenience of writing scripts and styles that were a tedious task in earlier versions of HTML.

You can still take advantage of HTML5 forms even if Javascript is disabled in the browser.

Read: 5 Great Tools to Create HTML5 Forms.

How to Create an HTML5 Form

Let’s understand how HTML5 forms work by looking into a practical example of creating a user registration form in HTML5.

We are going to learn how to create a simple HTML5 registration form. To begin, let’s get started with a blank HTML template page, as shown in the following code:

<!DOCTYPE html>

<html lang="en">

  <head>

      <meta charset="utf-8">

      <title> HTML5 Forms Tutorial </title>

      <link rel="stylesheet" href="style.css">

  </head>

  <body>

  </body>

</html>

We need to use the <form> tag to tell the browser that the form starts here:

<!DOCTYPE html>

<html lang="en">

  <head>

      <meta charset="utf-8">

      <title> HTML5 Forms Tutorial </title>

      <link rel="stylesheet" href="style.css">

  </head>

  <body>

    <form>

    </form>

  </body>

</html>

From this point on, we will only examine the code which lies inside the <form> tag.

With that in mind, let’s create a short and simple user registration form using the form tag and create input fields such as Name and Email. To make the ‘name’ field mandatory add the required attribute to that input field.

For email address, you can check the validity of the email address by adding the email attribute that will make sure that the entered text would be a valid email address – otherwise it will prompt an error. Also, add a required attribute to make it a mandatory field:

<form action="" method="">


      <legend>Registration Details</legend>


      <label>Name: <input type="text" required /></label>

      <label>Email: <input type="email" required /></label>

    ….


   <input type="submit" value="Register"/>

</form>

You can also use the autofocus attribute to automatically focus on the ‘name’ input field when the form page is loaded:

<input type="text" placeholder="disabled" required  autofocus/>

Some devices might have limited space on the screen, so in that case, you can remove labels and replace them with placeholders. Placeholders are also helpful in providing hints to the end-user.

<input type="text" placeholder="disabled" required autofocus/> 

<input type="email" placeholder="disabled" required />

Users can use previously entered data by selecting it from the option. The autocompete attribute stores the data in the datalist and allows the user to select the input values inserted previously. In that way, the user can just select the value and use it in the input field. Note that autocomplete should be turned off in fields (such as password) to avoid unauthenticated access.

The autocomplete attribute can be applied to a specific field. If you want to apply it to all the child elements(input) of the form, then apply it directly to the form element.

The next step is to use the address field. The text of the address might be a little longer, so it is better to use <textarea> here.

 <textarea rows="3" cols="50" id="address"  placeholder="disabled" ></textarea>

Note that we have used two new attributes: ‘rows’ and ‘cols’. The ‘rows’ attribute describes the number of text lines that appear in the field until a scrollbar appears. On the other hand, ‘cols’ defines the number of characters in each line.

You can give it a try and change the values of rows and columns and see how textarea contracts and expands accordingly.

Now, we have our final form. The full code will look like the following:

<!DOCTYPE html>

<html lang="en">

  <head>

      <meta charset="utf-8">

      <title>HTML5 Forms Tutorial</title>

      <link rel="stylesheet" href="style.css">

  </head>

  <body>

<form action="" method="">

      <legend>Registration Details</legend>

      <div>

      <input type="text" placeholder="disabled" required  autofocus/>

      </div>

      <div>      

      <input type="email" placeholder="disabled" required />

      </div>

      <div>

      <textarea rows="3" cols="50" id="address"  placeholder="disabled" ></textarea>

      </div>

     <div>

     <input type="submit" value="Register"/>

     </div>

</form>

  </body>

</html>

HTML5 Form Tutorials

Using forms in any website or app is crucial for handling input. But it can be a headache if the validation and errors are not handled properly. In such cases, building web forms can take up lots of development time. HTML5 has given web developers the ability to increase the scope of their applications by making the user interfaces more attractive and interactive. With HTML5 forms, the process is simpler and easier to validate input and provide consistency for accepting inputs in websites and apps.

Read more HTML5 web development tutorials.


Tariq Siddiqui
Tariq Siddiqui
A graduate in MS Computer Applications and a Web Developer from India with diverse skills across multiple Web development technologies. Enjoys writing about any tech topic, including programming, algorithms and cloud computing. Traveling and playing video games are the hobbies that interest me most.

Popular Articles

Featured