Thanks to directives like ngClass and ngStyle, it’s almost always possible to style text without resorting to setting CSS properties in TypeScript code as in:
document.getElementById("p2").
Nonetheless, there are times when some scripting code will be required in order to determine which class(es) or style(s) need to be activated under a specific condition.
Case in point, here are some screen captures of a Proof of Concept application that presents four clickable sections, each with its own label:
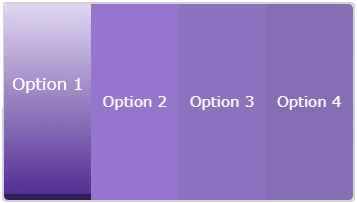
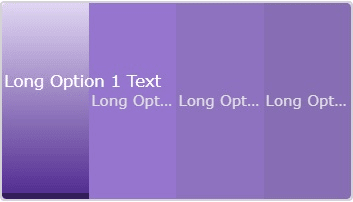
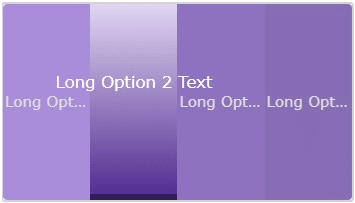
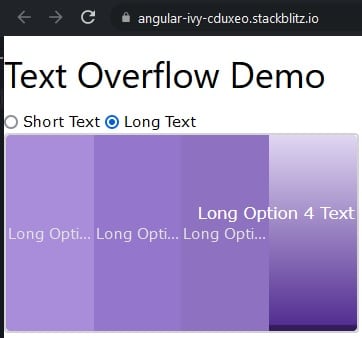
Long labels should be truncated and display an ellipsis, unless the section is selected, in which case the text should appear in full above the other labels:
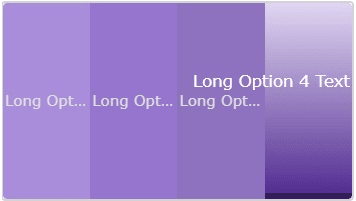
This is already pushing the limits of pure CSS, but there is yet another wrinkle! Special care must also be taken to keep labels within the component by aligning the two outer ones to the left and right like so:
If you have ever found yourself confronted by a similar challenge, we are going to take a look at one way to tackle it using a combination of CSS classes, the ngClass directive, and some programming code.
Read: Styling Text with CSS
Basic Styling with DIVs in Angular
The template contains a container DIV with four clickable option DIVs, each with a text SPAN:
<div class="container">
  <div class="option option1 w3-theme-l1">
    <span>Option 1</span>
  </div>
  <div class="option option2 w3-theme">
    <span>Option 2</span>
  </div>
  <div class="option option3 w3-theme-d1">
    <span>Option 3</span>
  </div>
  <div class="option option4 w3-theme-d2">
    <span>Option 4</span>
  </div>
</div>
The “w3-theme-xx” classes above refer to the W3.CSS Color Themes. Our app uses the Deep Purple theme because I like the color (as well as the band!).
Our own CSS contains the following rules:
.container {
  width: 90%;
  height: 200px;
  display: flex;
  border: 2px lightgray solid;
  border-radius: 4px;
}

.option {
  flex: 1;
  display: flex;
  align-items: center;
  justify-content: center;
  opacity: 70%;
  cursor: pointer;
  min-width: 0;
  padding: 2px;
}

.option > span {
  text-overflow: ellipsis;
  overflow: hidden;
  white-space: nowrap;
  width: inherit;
  color: lightgray;
}

.option1 {
  border-top-left-radius: 4px;
  border-bottom-left-radius: 4px;
}

.option4 {
  border-top-right-radius: 4px;
  border-bottom-right-radius: 4px;
}
Nothing too outlandish going on there, but notice that the option SPANs include the text-overflow: ellipsis, overflow: hidden, and white-space: nowrap properties, so that long text will be truncated and include an ellipsis, all without any work required on our part!
Read: Creating Layers on Web Pages with DIVs
Selecting an Option
In the template, we will bind the click event to the activate() method and set the ‘selected‘ class based on the value of the selectedDiv variable:
<div class="container">
  <div
    class="option option1 w3-theme-l1"
    [ngClass]="{'selected': selectedDiv === 0}"
    (click)="activate(0)">
    <span #firstOptionSpan>Option 1</span>
  </div>
  <div
    class="option option2 w3-theme"
    [ngClass]="{'selected': selectedDiv === 1}"
    (click)="activate(1)">
    <span>Option 2</span>
  </div>
  <div
    class="option option3 w3-theme-d1"
    [ngClass]="{'selected': selectedDiv === 2}"
    (click)="activate(2)">
    <span>Option 3</span>
  </div>
  <div
    class="option option4 w3-theme-d2"
    [ngClass]="{'selected': selectedDiv === 3 }"
    (click)="activate(3)">
    <span #lastOptionSpan>Option 4</span>
  </div>
</div>
At this point, the activate() method just assigns the index passed in to the selectedDiv variable in order to apply the ‘selected‘ class on the active option DIV:
public selectedDiv: number = 0;

public activate(index: number) {
  this.selectedDiv = index;
}
Back in the CSS file, we will add some classes to style the selected option DIV:
.selected {
  opacity: 100%;
  background: linear-gradient(#e0d6f2, #532e92) !important;
  border-bottom: 6px solid #341d5b;
}

.option.selected > span {
  overflow: visible;
  font-size: 1.1rem;
  z-index: 1;
  opacity: 100%;
  margin-bottom: 35px;
  color: white;
}
In this instance, the relevant property is the overflow: visible, which removes the ellipses to display the full text.
Read: 10 Ways to Use AngularJS
Handling Long Labels in Angular
Now, let’s imagine that the labels are stored in variables and may or may not extend past their container’s outer edges. The good news is that, for the inner options, nothing changes because our existing CSS already takes away the ellipses and formats the text just how we want it. The difficult part is to left or right-align the outer labels when the text overflows. To the best of my knowledge, there is no CSS attribute that tells the browser to change the alignment when text overflows (if you know of one, send me an email!). That being the case, we have to programmatically determine if the text overflows its boundaries in order to set a class that is specific to this condition. To do that, we will add the long-text class via the ngClass directives of the first and last option DIVs based on the boolean isLongText1stOption and isLongTextLastOption variables:
<div class="container">
<div
class="option option1 w3-theme-l1"
[ngClass]="{'selected': selectedDiv === 0, 'long-text': isLongText1stOption }"
(click)="activate(0)">
<span #firstOptionSpan>{{labels[0]}}
These will be set in the activate() method via the private isLongText() method:
public isLongText1stOption = false;
public isLongTextLastOption = false;
public activate(index: number) {
if (this.selectedDiv !== index) {
this.selectedDiv = index;
this.isLongText1stOption = this.isLongText(this.
The if check is there because, once the long-text class is applied, isLongText() always returns false.
The isLongText() method employs a tried and true technique for testing for overflowing content by comparing an element’s scrollWidth to its offsetWidth. The great thing about this technique is that it works even if the element’s width is set to 100%, which would give it the same width as its parent.
@ViewChild('firstOptionSpan')
private firstOptionSpan: ElementRef<HTMLSpanElement>;

@ViewChild('lastOptionSpan')
private lastOptionSpan: ElementRef<HTMLSpanElement>;

private isLongText(spanElementRef: ElementRef<HTMLSpanElement>): boolean {
  const spanElement = spanElementRef.nativeElement;
  return spanElement.scrollWidth > spanElement.offsetWidth;
}
The long-text rules themselves are very simple and merely set the justify-content property to the relevant value:
.option1.selected.long-text {
  justify-content: start;
}

.option4.selected.long-text {
  justify-content: end;
}
You’ll find the Text Overflow Demo on stackblitz.com. It includes radio buttons for selecting either short or long text labels:
Conclusion to Dynamic Text in Angular
Sometimes there is no way around employing programmatic logic to set styles. In such situations, be sure to set variables in the most efficient place rather than call a method directly from the template, as the latter will cause your method to be invoked constantly and consume a lot of processing cycles.