Angular applications do not have any quick way to achieve data persistence. As a result, the experience of developing large applications that require a lot of data communication among components can be very hectic. State management is perhaps the hardest part to manage in any large-scale application.
In this article, we will discuss the NgRx package and how it is used for state management and data communication in an Angular application. NgRx consists of many libraries that help the developers to manage the state in a large-scale, modern client-side Angular application.
Managing the State of Front-end Applications
In backend applications, we can use databases for state management. However, in the case of front-end applications, we also need some mechanism to store data. This data can be something like a response received from a server, form input data, or something else entirely.
The idea of reactive state management is to store all of the application state in a central store for data communication. So, in the context of state management, we have our state, which would be responsible for representing the application that actually lives in the store.
What is NgRx?
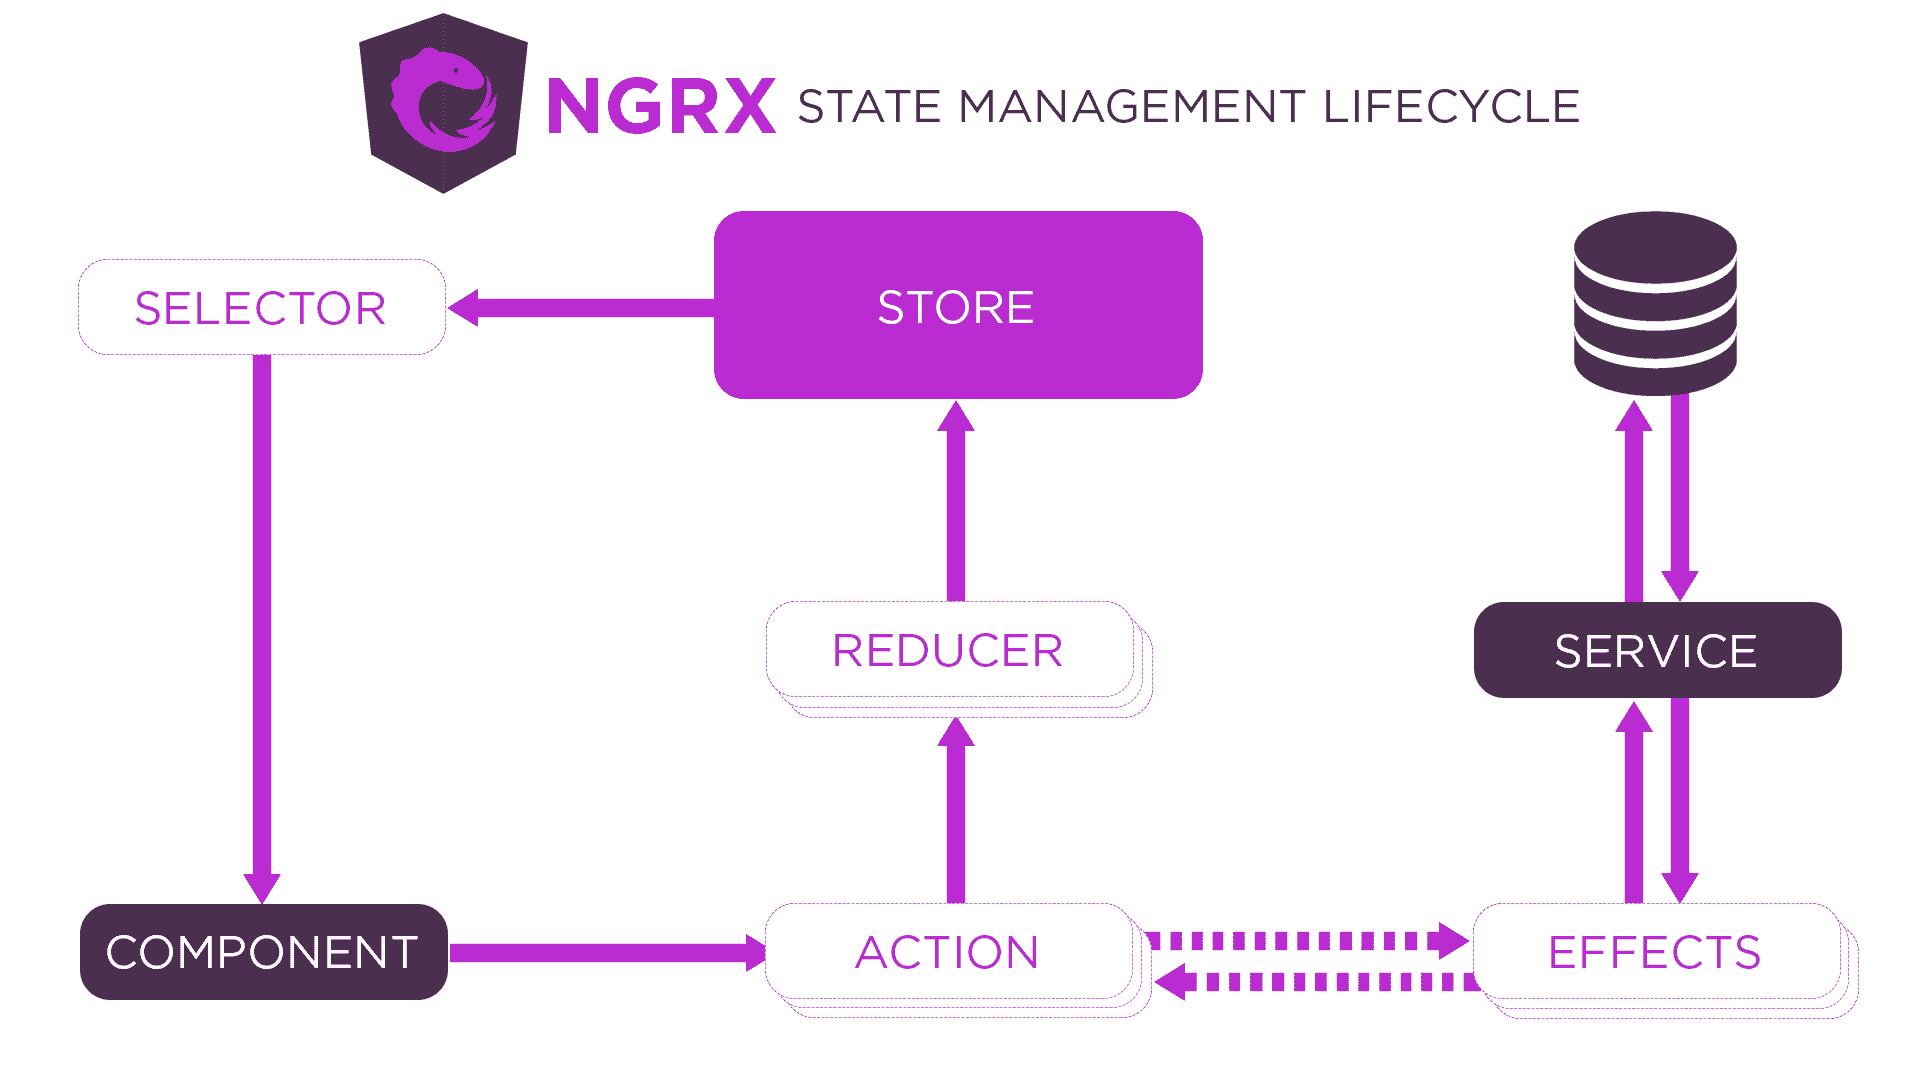
NgRx is a group of libraries that provide reactive state management in an application. A good state management system should enable you to give a representation of the state, update or modify its value, keep track of the state when the value changes, and, finally, retrieve the state. Inspired by the Redux pattern, NgRx provides a way for easily simplifying the application’s state and carrying out the unidirectional data flow in the application. The NgRx package is composed of the following libraries:
- Store
- Effects
- Entity
- RouterStore
- ComponentStore
Read: Working with Redux for State Management
NgRx and Redux
NgRx uses the Redux pattern. It consists mainly of three models:
Store: A central point that holds all the states of an application
Action: The unique events describing changes in the state of an application
Reducer: The functions used for carrying out the state transitions by bonding the store and actions together

Fundamental Elements of NgRx
In this section, we will see how the elements of NgRx – such as store, actions, and reducers – are used to simplify the process of state management in Angular applications.
NgRx Store
Store plays a vital role in state management. Store holds the data which we would be using in our app.
Here is an example of a store in NgRX:
const state = {
    persons: [
        {
            name: "Adam",
            age: 45
        }, {
            name: "George",
            age: 65
        }
    ],
    bookDescription: {
        name: "Name of Book",
        author: "Kate Chopin"
    }
}
NgRx Actions
NgRx actions are the methods dispatched by the component or service when an event is called. Here is an example of an NgRx action:
 const NameModifyAction = {
    type: "Name Modify",
    name: "Kate"
}
You can define the type and payload in the action method.
NgRx Reducers
NgRx reducers are the functions that handle the state transitions. It receives the current state and an action as arguments and returns a new state. To get a better understanding of reducers, consider the following code:
const _reducer = createReducer(
    initialState,
    on(nameOfAction, (state, action) => {
        return {
            ...state,
            someState: action.anyState
        }
    })
)
Here, createReducer function is responsible for handling the state transitions. We have also imported the initial state into our reducer file to access the current state. After that, the on event is used, which accepts the name of the action as a parameter and is used for triggering the action.
Read: How to Optimize Angular Applications
Building a Simple Angular App Using NgRx
Create a new Angular app by running the following command on your terminal:
ng new country-list
Next, Install the NgRx store in your project:
npm install @ngrx/store –-save
Now, open the application in VSCode (or any code editor or IDE which you like to use) and create a new folder called store inside the src/app directory.
Inside the store directory, create a models folder and define an interface there for country-list:
export interface CountryItem {
  id: string;
  name: string;
  shortName: string;
}
Next, create an Action directory inside the store folder. This is where we will define all the NgRx actions. So create a country.action.ts file inside the actions directory and add the following code to it:
import { Action } from '@ngrx/store';
import { CountryItem } from '../models/countryItem.model';
export enum CountryActionType {
  ADD_ITEM = '[COUNTRY] Add Country',
}
export class AddItemAction implements Action {
  readonly type = CountryActionType.ADD_ITEM;
  //optional payload
  constructor(public payload: CountryItem) {}
}
export type CountryAction = AddItemAction;
In the next step, we will create a reducers directory inside the store directory. In the reducers directory, we will create a country.reducer.ts file and add the following code to it:
import { CountryItem } from '../models/countryItem.model';
import { CountryAction, CountryActionType } from '../actions/country.action';
// //create a dummy initial state

const initialState: Array = [
  {
    id: '1',
    name: 'United States of America',
    shortName: 'US',
  },
];

export function CountryReducer(
  state: Array = initialState,
  action: CountryAction
) {
  switch (action.type) {
    case CountryActionType.ADD_ITEM:
      return [...state, action.payload];
    default:
      return state;
  }
}
Recall that the objective of any state management system is to keep all the state of an application in a single store so that it can be easily accessed from any part of the application. Now, we will create a file named state.model.ts inside the model directory and create an AppState interface using the following code:
import { CountryItem } from './countryItem.model';
export interface AppState {
  readonly country: Array;
}
Now, we need to register NgRx into our root module file app.modules.ts:
import { CountryReducer } from './store/reducers/country.reducer';
import { FormsModule } from '@angular/forms';
Next, we will register the imported modules in the imports array:
imports: [
    FormsModule,
    StoreModule.forRoot({
      country: CountryReducer,
    }),
  ]
NgRx is now ready to use in our components. So let’s modify our root component file app.component.ts so that we can use NgRx there:
import { Store } from '@ngrx/store';
import { Observable } from 'rxjs';
import { CountryItem } from './store/models/countryItem.model';
import { AppState } from './store/models/app-state.model';
import { NgForm } from '@angular/forms';
import { AddItemAction } from './store/actions/country.action';
@Component({
  selector: 'app-root',
  templateUrl: './app.component.html',
  styleUrls: ['./app.component.css'],
})
export class AppComponent implements OnInit {
  countryItems$: Observable<Array>;
  constructor(private store: Store) {}
  ngOnInit(): void {
    this.countryItems$ = this.store.select((store) => store.country);
  }
}
Here, we have defined the countryItem interface, brought in an RxJS observable, and our app state. We have also set countryItem$ to a type of observable, which is of type array, and, finally, set the value of countryItem$ observable to the returned state. We will use this information in our our template file app.component.html:
<div class="col-md-6 py-4">
        <ul class="list-group">
          <li class="list-group-item" *ngFor="let country of countryItems$ | async">
            {{country.name}}: <b>{{country.shortName}}</b>
          </li>
        </ul>
</div>
In the next step, we will create a user form for adding countries to the country list. In this project, we are using Bootstrap for a nice user-experience:
<!doctype html>
<html lang="en">
<head>
  <meta charset="utf-8">
  <title>Angular State Management Demonstration</title>
  <base href="/">
  <meta name="viewport" content="width=device-width, initial-scale=1">
  <link rel="icon" type="image/x-icon" href="favicon.ico">
  <link rel="stylesheet" href="https://cdn.jsdelivr.net/npm/[email protected]/dist/css/bootstrap.min.css"
    integrity="sha384-B0vP5xmATw1+K9KRQjQERJvTumQW0nPEzvF6L/Z6nronJ3oUOFUFpCjEUQouq2+l" crossorigin="anonymous">
</head>
<body>
  <app-root></app-root>
</body>
</html>
To bring the Bootstrap into our project, we have added Bootstrap CSS CDN to app/index.html file.
In the next step, we have to modify the app.component.html file accordingly so that the user can add the country name and short name to the list of countries.
<section>
  <div class="container">
    <div class="row">
      <div class="col-md-6 px-4">
        <h4>Angular State Management using NgRx</h4>
      </div>
    </div>
    <div class="row">
      <div class="col-md-6 py-4">
        <div class="card p-4 shadow-sm">
          <form #myform="ngForm" (ngSubmit)="addCountry(myform)">
            <div class="form-group">
              <label for="name">Identity</label>
              <input type="text" class="form-control" ngModel name="id" id="id" aria-describedby="name" required>
            </div>
            <div class="form-group">
              <label for="name">Country Name</label>
              <input type="text" class="form-control" ngModel name="name" id="name" aria-describedby="name" required>
            </div>
            <div class="form-group">
              <label for="department">Short Name</label>
              <input type="text" class="form-control" ngModel name="shortName" id="shortName" required>
            </div>
            <button type="submit" class="btn btn-primary">Submit</button>
          </form>
        </div>
      </div>
      <div class="col-md-6 py-4">
        <ul class="list-group">
          <li class="list-group-item" *ngFor="let country of countryItems$ | async">
            {{country.name}}: <b>{{country.shortName}}</b>
          </li>
        </ul>
      </div>
    </div>
  </div>
</section>
Next, we need to import the NgForm in our app.component.ts file and create a method to dispatch the AddItemAction:
export class AppComponent implements OnInit {
  countryItems$: Observable<Array>;
  constructor(private store: Store) {}
  			...
  addCountry(form: NgForm) {
    this.store.dispatch(new AddItemAction(form.value));
    form.reset();
  }
}
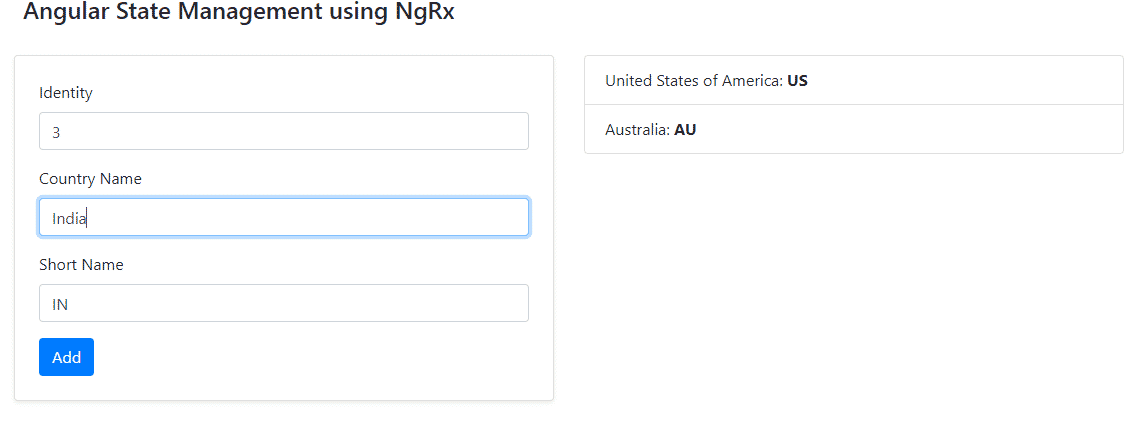
Here is a screenshot of the final result:

You can find the source code from this article on Github.
Read: Top AngularJS Alternatives


