The ViewChild decorator is the recommended way to access a directive, child component, or DOM element from a parent component class in Angular applications. Sure, you could use document.getElementByID() or similar JavaScript selector, but there are a few good reasons why that is not a good idea:
- It goes against Angular’s Component-based architecture by reaching over component boundaries and grabbing an outside element.
- Being reusable, a component’s template elements should not have have IDs to begin with. If you’re adding one in order to use document.getElementById(), you may be setting yourself up for bugs.
- Finally, ViewChild gives you the ability to read elements as different Object types, which plays a vitally important role in component interactions.
To that end, this tutorial will cover the ViewChild decorator’s many features as well as some of the numerous ways to use it.
Read: Parent-child Component Interaction in Angular.
Swapping ViewChild for document.getElementById()
Here’s a variation of Hello World that lets the user provide their name via a text input field:
<label>What's your name?
  <input id="txtWhoAreYou" type="text" />
</label>

<button mat-raised-button color="primary" (click)="setGreeting()">
  Submit
</button>

<p>{{greeting}}</p>
Clicking the Submit button triggers the sayGreeting() method. Here, document.getElementById() is employed to obtain a reference to the txtWhoAreYou input control:
export class AppComponent {
public greeting = '';
public setGreeting() {
this.greeting = 'Hello ' + document.getElementById('
The greeting variable is then updated in the template:

Now, let’s compare that to the correct way to reference DOM elements using the ViewChild decorator. It returns the first element that matches a given directive, component, or template reference selector:
export class AppComponent {
public greeting = '';
@ViewChild('whoAreYou')
private whoAreYouRef: ElementRef;
public setGreeting() {
this.greeting = 'Hello ' + this.whoAreYouRef.
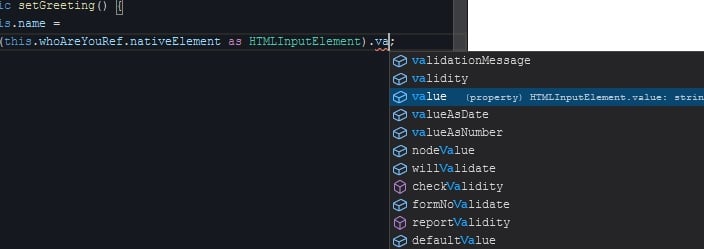
By default, DOM elements are stored as an ElementRef type. It simply acts as a wrapper to the native DOM element, and we can retrieve it by accessing the nativeElement property. It has a type of any, but you can cast it to the correct element type if you want its methods and properties to show up in VS Code’s auto-complete:
Referencing Components
ViewChild can also help us access child components – both from Angular libraries (i.e. Material) and custom. The secret lies in ViewChild’s second argument. It’s an object that contains Metadata Properties:
- selector: The component/directive type or the name used for querying.
- read: Used to read a different type from the queried elements.
- static: True to resolve query results before change detection runs, false to resolve after change detection. Defaults to false.
Setting the ViewChild’s read property to a MatButton allows us to access its class properties and methods:
export class GreetComponent  {
  @ViewChild('submitButton', { read: MatButton })
  public submitButton: MatButton

  //...
}
For example, having defined the submitButton variable as public, we can reference it from the template to set the focus on the Submit button whenever the Enter key is pressed while on the input field:
<label>What's your name?
  <input #whoAreYou type="text" (keydown.enter)="submitButton.focus()" />
</label>
Referencing a Custom Component
We can also use ViewChild to access a child component’s public class members. In this case, we don’t have to supply any additional parameters. As long as there is only one instance of the class in the template, we can reference it by name, as seen here in the AppComponent:
export class AppComponent implements AfterViewInit {
@ViewChild(GreetComponent) greetComponent: GreetComponent;
ngAfterViewInit(): void {
this.greetComponent.
The ngAfterViewInit hook is perfect for accessing ViewChild variables because they are guaranteed to be set by that time. They may or may not be set in ngOnInit.
public setGreeting() {
this.name =
(this.whoAreYouRef.
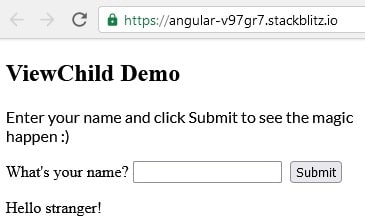
Assuming that the setGreeting() method is coded in such a way to fallback to a default name, as above, the user would be greeted by “Hello stranger!” when first loading the app:
How to Access the Greet Directive Using ViewChild
Directives are a special type of class allow you to alter the appearance or behavior of DOM elements and Angular components. In our case, we could offload all of the greeting functionality to an Attribute Directive like so:
<p [greet]="name">{{greeting}}</
The greeting variable is still there, but it is now set by the GreetDirective, whose full code can be seen below:
import { Directive, ElementRef, Input, OnChanges, Renderer2, SimpleChanges } from '@angular/core';

@Directive({
  selector: '[greet]'
})

export class GreetDirective implements OnChanges {
  @Input('greet')
  private name;

  constructor(
    private elem: ElementRef,
    private renderer: Renderer2
  ) { }

  ngOnChanges(changes: SimpleChanges): void {
    this.renderer.setProperty(
      this.elem.nativeElement,
      'innerText',
      'Hello ' + (this.name ? this.name : 'stranger') + '!'
    );
  }
}
It implements the OnChanges hook so that it can listen for updates to the name Input variable. Whenever its value does change, the directive employs the Renderer2 class to set its host element – the paragraph element – innerText property to the greeting.
Just like components, if you only have one instance of a Directive within a component, you can refer to it by class Name without the need for a template reference selector. Here’s an interesting use of a stand-alone setter that isn’t associated with a class variable. Instead, it sets the greeting of the child directive:
@ViewChild(GreetDirective)
set greeting(directive: GreetDirective) {
  directive.greeting = 'Buongiorno';
};
The directive, in turn, has the standard private member variable and public setter combination:
private _greeting = 'Hello';

public set greeting(greeting: string) {
  this._greeting = greeting;
}
Rather than send the greeting back to the parent component, it goes ahead and updates the greeting <P> element directly using the Renderer2’s setProperty() method. It accepts an element, property and property value:
this.renderer.setProperty(
  this.elem.nativeElement,
  'innerText',
  'Hello ' + (this.name ? this.name : 'stranger') + '!'
);
You’ll find the demo for this tutorial on stackblitz.com.
Conclusion
This tutorial covered the ViewChild decorator’s many features as well as the various ways to use it. As we saw, we can utilize it to reference components, DOM elements, and directives and store them as a variety of types.