Create a Nested Multi-select Tree with in Angular: Part 2
In this web development tutorial series, we are creating an alternative to the HTML SELECT control that is better suited for displaying hierarchical data. In the last installment, we learned about the different types of MatTrees in Angular and then configured a Nested Tree to show three levels of vehicle information: manufacturer, model, and trim level. Today, we will incorporate checkboxes into our tree so that the user can select items.
How to Set the TreeControl Parent Node
The TreeControl only manages the expanding and collapsing of nodes, and not checkbox states. For that reason, we need to keep track of each node’s children and parent. To do that, we will add a few optional properties to the VehicleNode interface – namely selected, indeterminate, and parent:
interface VehicleNode {
  name: string;
  id?: number;
  children?: VehicleNode[];
  selected?: boolean;
  indeterminate?: boolean;
  parent?: VehicleNode;
}
Strictly speaking, there is no reason that these have to be part of the node interface, but it’s a lot easier than storing them separately, which would necessitate linkling them to their associated nodes.
The children are already members of the original TREE_DATA array, but nodes’ parents have not been set. We should do that as early as possible, so the constructor is the perfect place for it:
constructor() {
this.dataSource.data = TREE_DATA;
Object.keys(this.dataSource.
The setParent() needs to invoke itself recursively for each child so that no node is overlooked.
Read: Ten Ways to Use Angular JS
Checkbox Placement In the HTML
This would be an opportune time to view the template file. We will plan on inserting the checkboxes just before the node name, so see if you can spot them below:
<mat-tree [dataSource]="dataSource" [treeControl]="treeControl" class="example-tree">
<!-- This is the tree node template for leaf nodes -->
<!-- There is inline padding applied to this node using styles. -->
<mat-tree-node *matTreeNodeDef="let node" matTreeNodeToggle>
{{node.name}}
</mat-tree-node>
<!-- This is the tree node template for expandable nodes -->
<mat-nested-tree-node *matTreeNodeDef="let node; when: hasChild">
<div class="mat-tree-node">
<button mat-icon-button matTreeNodeToggle
[attr.aria-label]="'Toggle ' + node.name">
<mat-icon class="mat-icon-rtl-mirror">
{{treeControl.isExpanded(node) ? 'expand_more' : 'chevron_right'}}
</mat-icon>
</button>
{{node.name}}
</div>
<!-- There is inline padding applied to this div using styles.
This padding value depends on the mat-icon-button width. -->
<div [class.example-tree-invisible]
By using the “them” pronoun above, I was hinting that there would be two node names: one for expandable nodes and another for leaf nodes. There are two kinds because expandable nodes include a button for expanding and collapsing tree sections. The button is designated using the matTreeNodeToggle directive.
To differentiate between root and leaf nodes, the MatTree relies on the hasChild() method that we must provide. It is supplied with two arguments: the node index and node object. Here is our implementation:
hasChild = (_: number, node: VehicleNode) =>
    !!node.children && node.children.length > 0;
After we put the checkboxes inside tree-node elements, the updated markup will look like this:
<mat-tree [dataSource]="dataSource" [treeControl]="treeControl" class="example-tree">
<!-- This is the tree node template for leaf nodes -->
<mat-tree-node *matTreeNodeDef="let node" matTreeNodeToggle>
<li class="mat-tree-node">
<mat-checkbox class="checklist-leaf-node"
(change)="itemToggle($event.
With everything in place, the only thing remaining is to add some CSS to fine tune the visuals:
.example-tree-invisible {
  display: none;
}

.example-tree ul,
.example-tree li {
  margin-top: 0;
  margin-bottom: 0;
  list-style-type: none;
}

.checklist-leaf-node {
  padding-left: 40px;
}
Read: Create a MatMenu with Checkboxes
How to Track Checkbox States
If no one keeps track of which checkboxes are selected, the application will allow you to toggle checkboxes, but it will not maintain any hierarchical states that you would expect from a tree. The rules for checkbox states are as follows:
- Clicking an expandable node should select and deselect all its child nodes accordingly.
- Clicking a child node, whether expandable or a leaf, should cause the parent node’s checkbox to become indeterminate (if there are some unchecked siblings) or checked (if all siblings are checked as well).
In the template, the checkbox change event is bound to the itemToggle() method. It receives two parameters: whether the checkbox is being checked or unchecked and the node. There, we track the node’s selected state and proceed to do the same for all of its children (descendants) and parents (ancestors):
private itemToggle(checked: boolean, node: VehicleNode) {
  node.selected = checked;
  if (node.children) {
    node.children.forEach(child => {
      this.itemToggle(checked, child);
    });
  }
  this.checkAllParents(node);
}
The checkAllParents() method has the extra task of setting the indeterminate attribute in addition to selected. To do that it calls the Array some() and every() functions respectively. The former returns true if at least one child node is selected, while the latter requires that all children are selected. The parent node’s descendants are fetched courtesy of the treeControl’s getDescendants() method. Note that the checkAllParents() method has to call itself recursively in order to make its way all the way up the hierarchy:
private checkAllParents(node: VehicleNode) {
if (node.parent) {
const descendants = this.treeControl.
Retrieving Selected Nodes
After going through the trouble of making nodes selectable, it only makes sense to do something with them. In this case, we will place a button at the bottom of the form that displays selected nodes:
<button class="submit-button" mat-raised-button (click)="submit()">Submit</button>

<p #outputDiv></p>
In the submit() method, we can utilize the amazing Array.reduce() function to iterate over all of the root nodes, fetch their descendants, and map the names of selected nodes to our result array:
@ViewChild('outputDiv', {static: false})
public outputDivRef: ElementRef<
Here is some sample output:
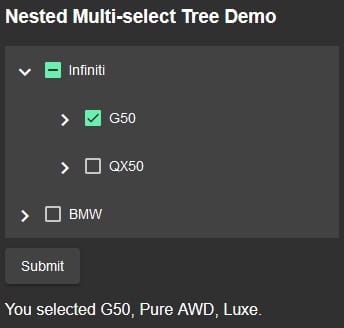
As always, there’s a demo of the Nested Multi-select Tree on stackblitz.
Going Forward with MatTree and Angular
So far in this series, we created a nested MatTree and turned it into a multi-select control by adding checkboxes. In the next and final installment, we will open the tree inside of a MatMenu as a stand-in for the MatSelect.