WordPress’s outstanding versatility has catapulted it far beyond its humble beginnings as a blogging platform. It appeals both to the novice and expert developer, allowing him or her to create anything from simple static sites to large-scale eCommerce systems. I have witnessed the best and worst features of WordPress first-hand over the years. Most recently, I implemented a custom form for uploading and importing Excel spreadsheets. I talked a bit about this in my Export Data from Your Website as an Excel Spreadsheet and Create a File Uploader in WordPress tutorials. Today, I’d like to tie these together by covering how to construct a dynamic Import form in WordPress.
What does “Dynamic” Mean?
I’ve been involved in some passionate discussions with other developers over what we mean when we say “dynamic” with regards to web forms. Some say that creating the form on the fly using a server-side language such as Java or PHP makes it dynamic. Others insist that a form isn’t truly dynamic unless it can be modified on the client-side, no matter how it was originally served. Whatever your own interpretation may be, this form will cover all of the bases as it will be outputted by PHP and then updatable by the client using jQuery-enhanced JavaScript.
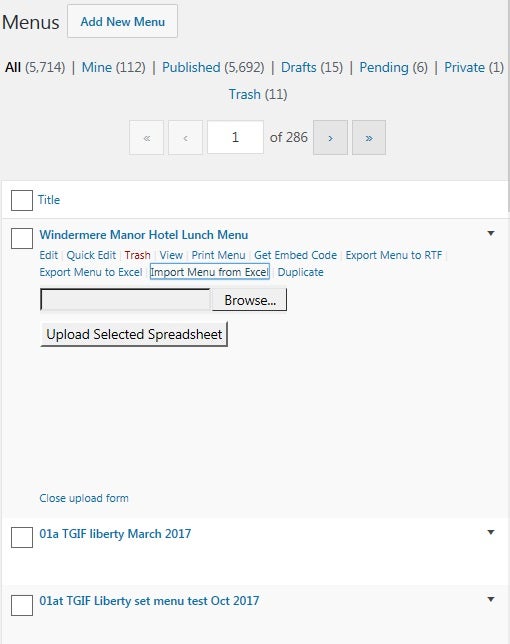
It’s going to be part of the menu items on the admin post list page. We will add a “Import Menu from Excel” link that will open the form. Here’s what the it will look like when we’re done:
Including our Link
The “page_row_actions” filter hook is the place to modify the menus on post list pages. We do that by setting the row action links. We can either change the defaults of ‘Edit’, ‘Quick Edit’, ‘Restore, ‘Trash’, ‘Delete Permanently’, ‘Preview’, and ‘View’, or we can add our own. Here are the upload and download links:
function menu_utilities_link( $actions, $post ) {
        if ($post->post_type == 'menu' && is_super_admin() ) {
    $actions['export-menu-to-excel'] = '<a href="' . plugins_url('myExcelPlugin/main.php') . '?menu=' . $post->ID
         . '" title="Export Menu to Excel" rel="permalink" download="' . $post->post_name . '.xlsx">Export Menu to Excel</a>';
    $actions['import-menu-from-excel'] = '<a href="#" data-post-id="' . $post->ID . '"'
         . ' title="Import Menu from Excel" rel="permalink">Import Menu from Excel</a>';
        }

        return $actions;
}
add_filter( 'page_row_actions', 'menu_utilities_link', 10, 2 );
You’ll notice that the import link has no URL — just the top of the page hash symbol ‘#’. That’s because the client-side JavaScript will take care of that. I use jQuery to facilitate working with the DOM; it tends to be better to bind handlers to elements using jQuery’s on() function.
The ‘admin_enqueue_scripts’ action hook is where our JavaScript gets appended to the page. The tricky part is that it gets invoked for all admin screens, so we have to make certain that the current screen is the one we want:
function enqueue_menu_utilities($hook) {
    $screen = get_current_screen();

    if('edit.php' == $hook
          && in_array($screen->post_type, array('menu', 'restaurant'))
          && !is_single()) {
                          wp_enqueue_script(
                 'phpexcel-script',
                                        plugins_url() . '/myExcelPlugin/phpexcel.js'
         );
   }
}
add_action( 'admin_enqueue_scripts', 'enqueue_menu_utilities' );
Binding to the Link’s Onclick Event
In order to bind our handler to the link, we need to know a little bit about the page elements:

As shown in the above image, each link is enclosed within span tags, along with the “|” delimiter. We can’t reference the link by ID because there is an “Import Menu from Excel” for every item in the post list. Instead, we can use jQuery’s handy three argument on() function, which captures events for every element within the method invoker (the element to the left of the dot “.” accessor). The second argument specifies which element(s) within the parent we are interested in listening to:
jQuery(function($){
  $('div.row-actions').on(
    'click',
    'span.import-menu-from-excel > a', function(evt) {
      //cancel the link navigation
      evt.preventDefault();
  });
});
Rendering the Form
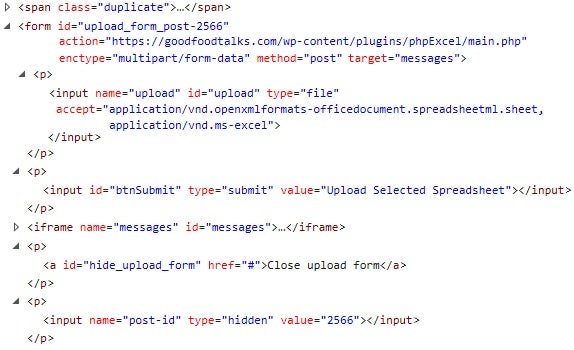
Now this is where the rubber really meets the road. The entire form is built up element by element, and attribute by attribute. There’s an upload control, a submit button, an iFrame to display the results of the import operation, a link to hide the form, and a hidden field that sends the post ID to the server:
  var $linkElt   = $(evt.target),
      parentRow  = $linkElt.closest('div.row-actions'),
      uploadForm = parentRow.find('form[id^=upload_form_]')
      menuId     = $linkElt.data('post-id');

  $('<form>')
    .attr('id','upload_form_'+$linkElt.closest('tr').attr('id'))
    .attr('action', pluginsUrl+'/myExcelPlugin/main.php')
    .attr('method', 'post')
    .attr('enctype', 'multipart/form-data')
    .attr('target', 'messages')
    .on('submit', uploadFile)
    .append(
      $('<p>')
        .append(
          $('<input>')
            .attr('id',   'upload')
            .attr('name', 'upload')
            .attr('type', 'file')
            .attr('accept','application/vnd.openxmlformats-officedocument.spreadsheetml.sheet'
                          +', application/vnd.ms-excel')
          )
    )
    .append(
      $('<p>')
        .append(
          $('<input>')
          .attr('type', 'submit')
          .attr('id', 'btnSubmit')
          .val('Upload Selected Spreadsheet')
        )
      )
      .append(
        $('<iframe>').attr('id', 'messages').attr('name', 'messages')
                  .on('load', resetForm)
      )
      .append(
        $('<p>')
          .append($('<a>')
            .attr('href', '#')
            .attr('id', 'hide_upload_form')
            .click(hideForm)
            .text('Close upload form')
          )
      ).append(
        $('<p>')
          .append($('<input>')
            .attr('type', 'hidden')
            .attr('name', 'post-id')
            .val(menuId)
          )
      ).appendTo($('<div>')).appendTo(parentRow);
Here is the produced HTML:
While I couldn’t create a demo on WordPress, I did manage to fashion a fairly reasonable facsimile on Codepen. Give it a try!
Conclusion
Yes, our form is a handsome one, but it’s still not done. There are more event handlers to write such as validation and what happens after the import. These will all be covered in the next article in this series.