Some developers consider themselves to be server-side specialists, while others focus most of their efforts on client-side coding. The departments of IT shops often reflect those tendencies. However, that need not be the case. Thanks to the emergence of technologies like Node.js, you can write both the server and client components using essentially the same language. In this series on RESTful Web services we’ll cover how to to do it all using JavaScript. Today’s installment will focus on setting up a basic Web service using Node.js and the Express framework.
JavaScript: It’s Not Just for the Client Anymore
The original JavaScript language that we all know and love can only run within the confines of a web browser. The creators of Node.js took Chrome’s V8 JavaScript engine and tailored it for building scalable network applications that run on the server-side. And if that wasn’t good enough, several frameworks have cropped up to make server-side development even easier! One such framework is Express. It’s an application framework that provides a robust set of features specifically for web and mobile applications.
Here’s a Node.js service that listens for requests on port 3000 and returns a “Hello World” message:
const http = require('http');
const hostname = '127.0.0.1';
const port = 3000;

const server = http.createServer((req, res) => {
  res.statusCode = 200;
  res.setHeader('Content-Type', 'text/plain');
  res.end('Hello World');
});

server.listen(port, hostname, () => {
  console.log(`Server running on port ${port}/`);
});
Let’s compare that to the same service built with Express:
const express = require('express');
const server = express();
const port = 3000;

server.get('/', (req, res) => {
  res.send('Hello World!')
})

server.listen(port, () => {
 console.log(`Server running on port ${port}`);
});
While you certainly do not need Express to write Web services, it does offer several benefits, including more succinct code, HTTP utility methods and middleware, improved performance, to name a few.
What are Web Services?
Not everyone agrees on what distinguishes a web service from regular HTTP requests, APIs, Service Oriented Architecture, etc., but, for the purposes of this series, let’s define a web service as any piece of software that makes itself available over the Internet using a standardized data transfer protocol such as XML or JSON to encode all communications between it and clients. You could even use plaintext for very simple services, but, in most cases, employing a standardized data transfer protocol will allow your service to communicate with clients on any operating system as well as built using any programming language. Hence, a Java service can communicate with an Angular client and a Windows server can respond to requests from Unix applications. There are some other criteria such as being discoverable via a simple find mechanism, but that is beyond the scope of this series.
A RESTful Web Service is one that is built on the REST architecture. REST stands for “REpresentational State Transfer”. It’s been around ever since 2004, when the web consortium released the definition of the RESTful standard. Since that time, the REST standard has become quite popular and is now being used by many of the most popular websites around the world including Facebook and Twitter.
There are other types of Web services as well, the other main one being SOAP. Short for “Simple Object Access Protocol, it’s a very old web services access protocol that was originally developed by Microsoft. It’s considered to be a bit of a dinosaur nowadays and is rarely encountered any more. Having had the opportunity to work with SOAP a few years back, I can see why REST eclipsed it.
Getting Started
There are few piece that you’ll need in place in order to follow along with this series:
- Node.js: On the download page, you’ll find installers for every major platform.
- Visual Studio Code: While not essential, I do all of my work in VS Code because a good IDE can really make coding a lot easier. VS Code is a good choice because it’s FREE and offers many useful features such as debugging, task running, and version control.
- Express: Once Node.js is installed, you can use it to add Express by running $ npm install express –save command from the command-line.
Generating the package.json File
Our server app will be comprised of two files: a JavaScript file and a package.json file. The package.json file contains information about the application, including the name of the app, version, a description, and the entry point of the application.
There are a few ways to generate it. We could use the Express generator, but it creates the scaffolding for a full app with numerous JavaScript files, Jade templates, and extra sub-directories. Instead, we’ll create it using the Node Package Manager (npm) that comes with Node.js:
- Choose or create a directory that will contain our app and then open it in VS Code.
- Open up a Powershell Terminal in VS Code by selecting Terminal -> New Terminal from the main menu.
- Type “npm init” at the command-line and hit ENTER.
The utility will walk you through the package.json file creation process. It will even include sensible defaults where ever possible.
Here’s what mine looks like:
{
  "name": "rest-server",
  "version": "1.0.0",
  "description": "A basic REST server.",
  "main": "server.js",
  "scripts": {
    "test": "echo \"Error: no test specified\" && exit 1"
  },
  "author": "Rob Gravelle",
  "license": "ISC"
}
Installing Express
We can also use npm to install dependencies like Express. Here’s the command to do that:
npm install express --save
The -save flag tells npm to add express as a dependency in our package.json file.
The Server Code
All we need now is a server.
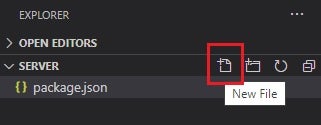
- Create a new file using the New File button in the VS Code EXPLORER and name it “server.js”. If you don’t see the New File button, it’s because it only comes up when you hover over the EXPLORER pane:

- Add the following code to the new server.js file:
const express = require("express");
const app = express();

app.listen(3000, () => {
 console.log("Server running on port 3000");
});
And that’s all there is to it. We’ve got ourselves a new server!
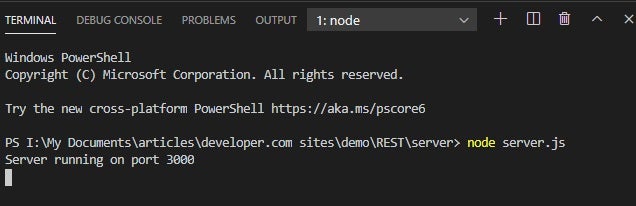
Running the App
To run your app, issue the node app.js command in the VS Code terminal. You should see our console.log() message displayed:
Conclusion
In part one of this series on RESTful Web services we set up a basic Web service using Node.js and the Express framework. You can see the fruits of our labors in the demo below: